I’ll get this started right off the bat by saying we aren’t creating a mold through some sort of casting process to actually create a golf club head. Although truthfully I’d love to learn how to do that. Instead, you’ll learn how to make your own golf clubs by having the pre-made raw materials. Don’t worry if you don’t have the individual pieces needed to put together a golf club. Just bookmark this post and you can revisit at any time.
I’m not going to make any specific club part recommendations as I’ll let you do some research as to what brand you may like. So whether it is Taylormade, Callaway, Cobra, Mizuno, etc… I would first start looking at that brand and iron heads only on Ebay. You’re welcome to look at either new or used irons. Don’t freak out if you see high prices initially. The latest years models are sold at premium prices. I typically look at models that are a few years old.
Quick Recommendation
My recommendation: Look at cavity back irons or what some call game improvement irons if you have a double digit handicap or shoot about low 80’s. Consider blade irons if you are a single digit handicap. Having said that, most of the top LPGA players use cavity back irons. Yes, more than 4 out of 5 of the top 50 LPGA players use cavity back irons. Consistency is key.
Buy shafts that match the hosel of the iron. For instance, make sure the shaft tip is .370 if the iron hosel is .370. Makes building so much easier.
What Do You Need to Make Your Own Golf Clubs?
- iron heads
- shafts
- golf grips
- ferrules
- double sided tape and masking tape
- grip solvent
- two part epoxy
I picked up these grips as well as tape, rubber wedge for a vice, hook blade and grip solvent. Hard to beat this deal.
Let’s Build One Club for Starters
For purposes of this article, I am going to take a single iron head, ferrule, shaft, and grip and put them together. I’d like to try to get dialed in with an 8 iron. I currently have a couple of different graphite shafts and a steel shaft. In past years I’ve been going lighter in shaft weight with the thought process of adding swing speed and picking up some yards. It may have worked against me in adding to dispersion (offline shots). So I’m going to trade in a graphite shaft for a steel one.
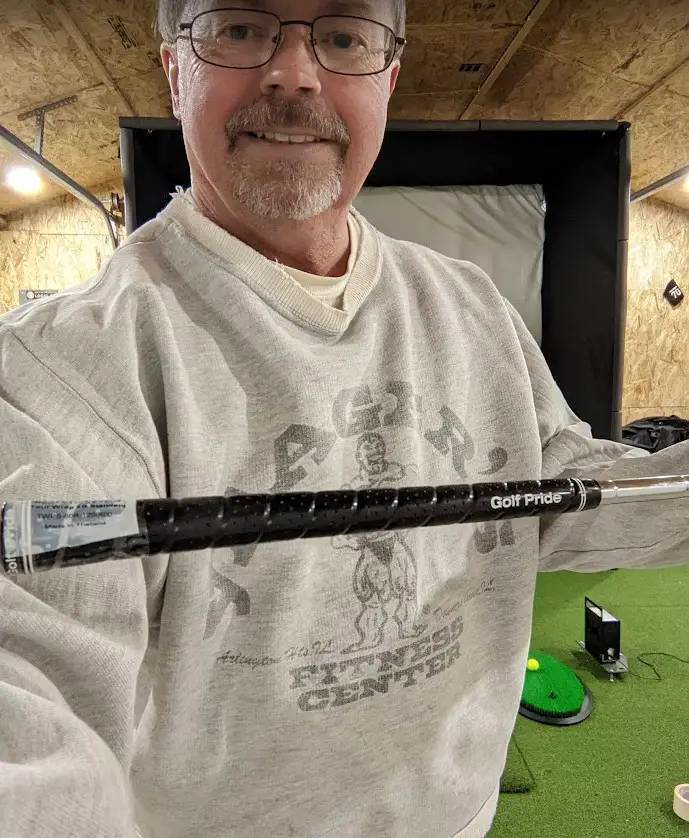
I have a Taylormade Burner 8 iron. True Temper Dynamic Gold steel shaft. Golf Pride Tour Wrap 48 gram grip. I am going to weigh each of the components before putting them together. After putting the club together I’ll check the swing weight to make sure it is within a decent range of lets say D0 to D3. If you don’t have a contraption like I do to measure swing weight, you can make use of a swing weight calculator here.
Currently, I play with a Sub70 699 8 iron. It does better than my older clubs in so far as distance is concerned but again I would like to reduce dispersion. It was my request when having the clubs built during covid to have the lighter shafts and grips. Note to self I should have gone in for a fitting but this was during the first few months of covid. So if the added weight works to reduce dispersion with the Taylormade Burner 8 iron, I’ll look to do the same with the Sub70 8 iron.
Accessories When Making Your Own Golf Clubs
- Tube cutter for steel shafts or fine tooth hacksaw for graphite shafts
- 80-100 grit sandpaper for steel shafts or 150-220 for graphite shafts
- A sharpie to mark shafts at cutting point
- Plastic paint tray liner
- Thin Rubber Gloves
- Paper towel
Let’s Get Started with the Iron Head
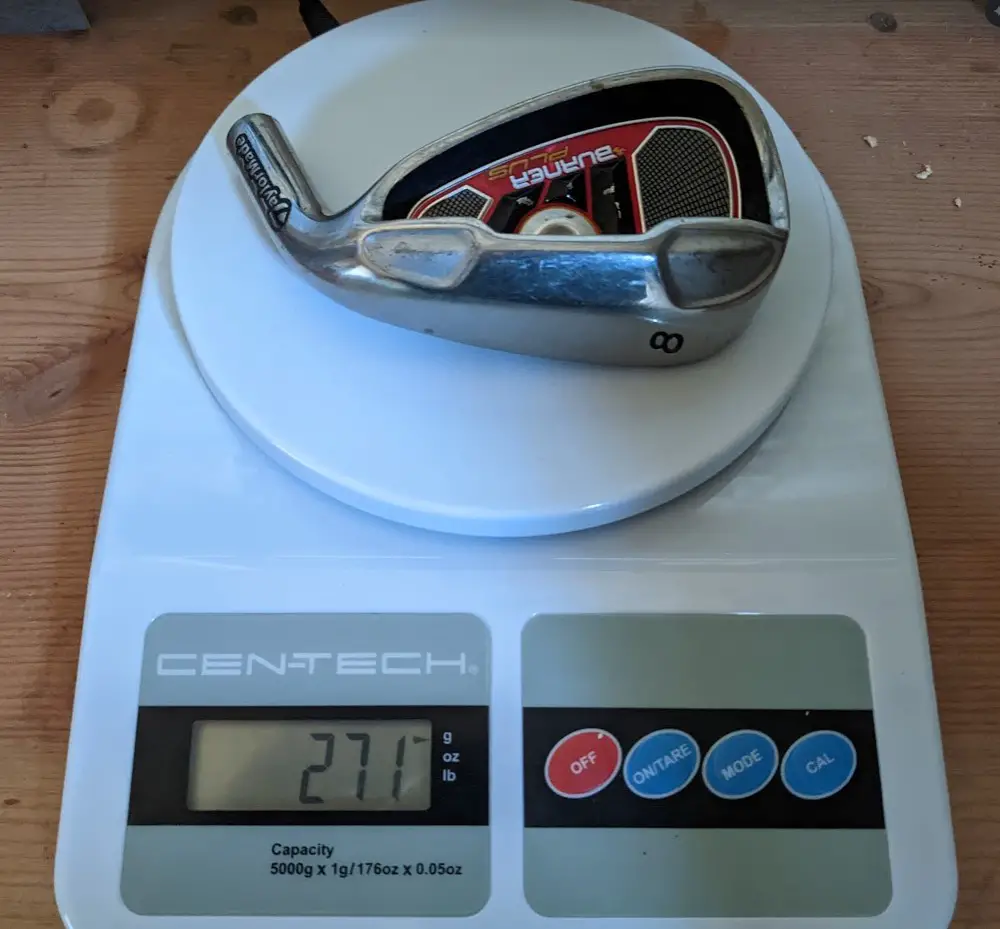
Grab your iron club head. If the iron is pre-owned or used, I recommend grabbing a drill with a 5/16″ drill bit to make sure there is no dry epoxy in the hosel. Just use the drill at a slow speed for maybe 30 seconds to a minute. No need to do this if you have a new iron head. If you have acetone and a Q-tip, use a dab of acetone on a Q-tip and rub around the inside of the hosel. Your iron head is now ready. I decided to weigh my new 8 iron club head. 271 grams.
Shaft Length
Shaft length depends on the make of the iron, the club you are making, (ie 3 iron to pitching wedge), and your height. It is oftentimes difficult to nail this down but we have a general guideline. The below numbers are for a steel shaft. It is recommended to add 1/2″ to each of these numbers if using a graphite shaft. The numbers below are for men. Women should subtract 1 inch from these numbers while also taking height into consideration when making your own golf clubs.
Club Steel Shaft Graphite Shaft
3-iron 39 inches 39.5 inches
4-iron 38.5 inches 39 inches
5-iron 38 inches 38.5 inches
6-iron 37.5 inches 38 inches
7-iron 37 inches 37.5 inches
8-iron 36.5 inches 37 inches
9-iron 36 inches 36.5 inches
PW 35.5 inches 36 inches
SW 35.5 inches 36 inches
Take Height Into Consideration
I’m a male who stands all of 5′ tall when I stretch. So yeah, sometimes I put my big boy shoes on and swing with a “regular” sized driver and irons/woods/hybrids but I do find that consistency is much better when the clubs are shortened. This is what I loosely go by:
4’10” and under -2 inches
4’10” to 5′ tall -1 1/2 inches
5′ to 5’2″ tall -1 inch
5’2″ to 5’4″ tall -1/2 inch
5’4″ to 5’7″ tall -1/4 inch
5’7″ to 6’1″ tall standard length
6’1″ to 6’2″ tall +1/4 inch
6’2″ to 6’4″ tall +1/2 inch
6’4″ to 6’6″ tall +1 inch
6’6″ to 6’8″ tall +1 1/2 inches
6’8″ and over +2 inches
Shaft Time
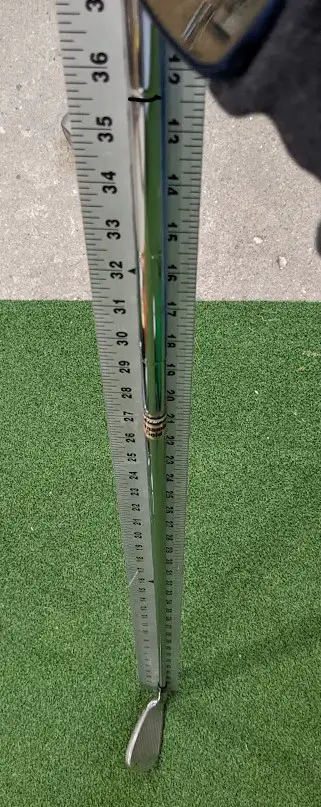
I am building an 8 iron with a steel shaft so I’ll use the dimensions given in the “Shaft Length” section of 36.5 inches and then reduce that by 1 inch because of the Take Height Into Consideration section. So 35.5 inches will be my 8 iron shaft length. Our shaft does not have a grip on it so we will measure it out with a tape measure or 48 inch measuring stick. I used a t-square that I bought to work on drywall a couple of years ago. To figure out where to cut the shaft, place the iron head on the shaft with the head flat on the ground. So neither the toe or heel will be in the air. Place the club head flat on the ground and measure for the club you are building. I took my sharpie and placed a mark at 35.5 inches.
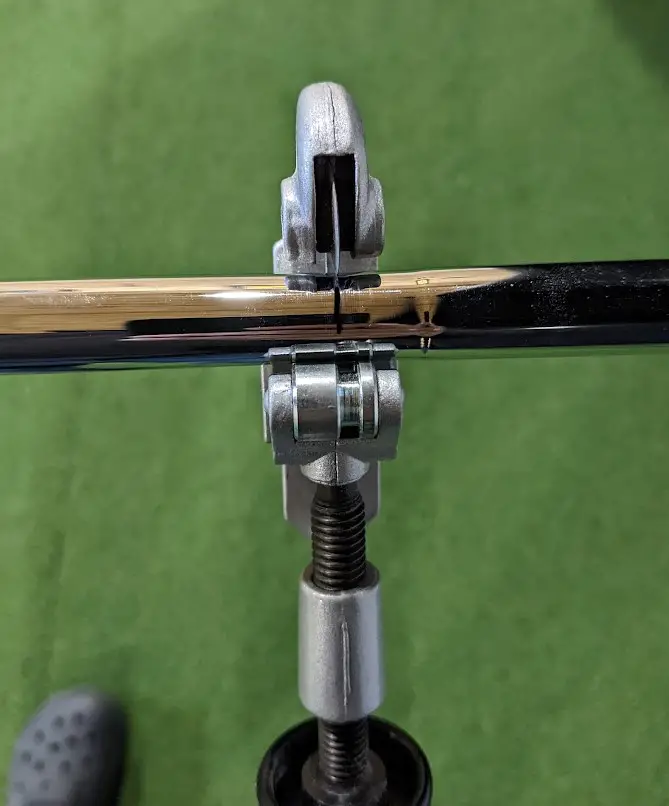
Cut the steel shaft to length with a tube cutter at the butt end (not the tip end where the club head goes). Don’t buy a cheap tube cutter or you will have issues cutting. By cheap I mean the one’s that are about 2 or 3 inches long. I think my golf club shaft cutter tool is about 5-6 inches long. The best way to cut the steel shaft is to put the shaft into a vice with a rubber wedge so it is secure in holding the shaft. I sorta free-handed this one by getting the tube cutter fairly tight, turning a few times, tightening the tube cutter, turning a few times and repeating about half a dozen times until the shaft was cut. NOTE: Do not do this with a graphite shaft. You will ruin the shaft. If cutting a graphite shaft, use a fine tooth hacksaw.
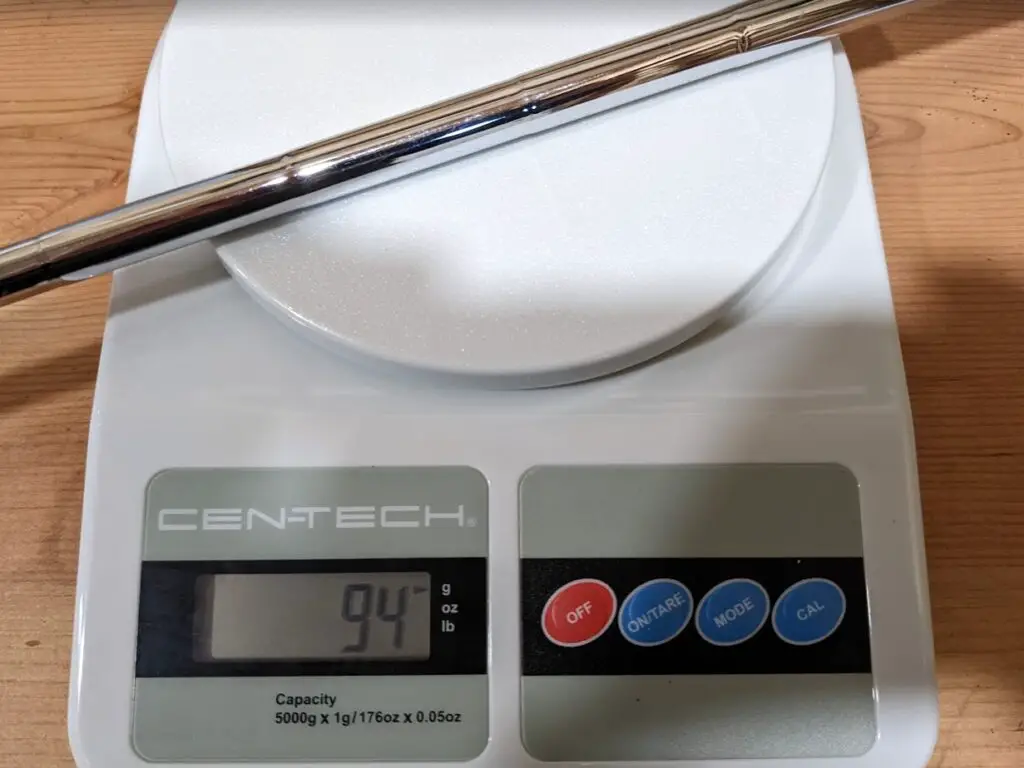
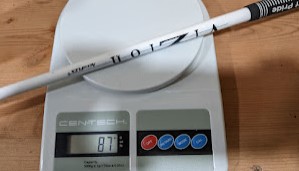
After being cut, my 8 iron shaft weighs 94 grams. With the new grip installed with ferrule, tape, and epoxy it will be about 145 grams. Believe it or not the previous 8 iron graphite shaft and grip both weighed 87 grams. Yeah, the old grip was only 25 grams.
Old shaft and grip weight.
Installing the Club Head and Ferrule
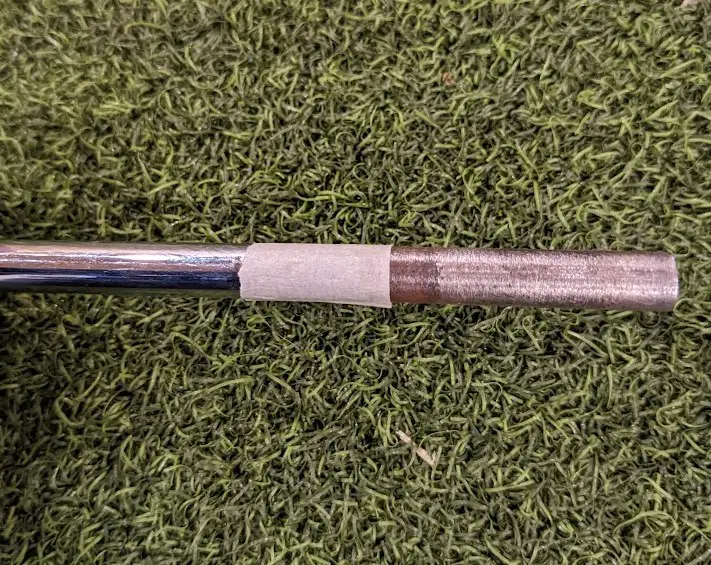
The ferrule should be the same size as the shaft. So look to see whether you need .335, .355, or .370. Let’s do a dry run. Put the ferrule over the tip of the steel shaft followed by the club head. Put a small piece of masking tape once around the shaft where the ferrule meets the steel shaft. Now remove the ferrule and club head. The piece of masking tape will serve as the point where we will stop sanding. So let’s get on with this. Rough up the tip of the steel shaft with between 80-100 grit sandpaper up to the point of the masking tape. Sand only enough to remove any smooth areas on the tip of the shaft. Shouldn’t take any more than maybe 15 seconds.
Mix up some of the two part epoxy. Usually will need to mix for about 20 seconds or so. The epoxy I use came with a small spoon and tray but something like a small popsicle stick or even part of the cardboard will work well for mixing and applying the epoxy. Heck, I sometimes use a tee to mix the epoxy. Will only need enough to install the ferrule and club head. There is fast drying and slow drying epoxy. I typically use slow drying but I do have and use both. You just have to work quite a bit quicker with the quick cure epoxy.
Put some epoxy from the tip up to the tape on the shaft. I sometimes put a very very very light amount of epoxy inside the hosel but that is not absolutely necessary. Now put the ferrule on the shaft up to the piece of tape and put the club head on quickly thereafter. Turn the club head around the shaft a few times to make sure the epoxy is evenly coated between the shaft and hosel. Then make sure the club head is fully seated. Wipe off any spillage of epoxy on the club or ferrule with a small piece of paper towel. Put a piece of masking tape over both the club head and ferrule. This will keep both in place for the drying process. I lay the club sideways over a cardboard box or the like.
Wait 24 Hours
I typically give the club head 24 hours to fully seat and cure at about 70 degrees fahrenheit. What I like to do is keep some of the epoxy (test) that was mixed but not used in the same room where the club head was installed. Come back after that 24 hours and see if the test epoxy is dry. Touch the test epoxy. Make sure it isn’t gooey. If it is gooey, it is possible it wasn’t mixed properly or there was a problem with the epoxy. If that is the case, your club head and ferrule should be removed and you would need to start over. However, at this point I imagine that is not the case and your epoxy is dry. If so, you can remove the tape. It is time to install the grip.
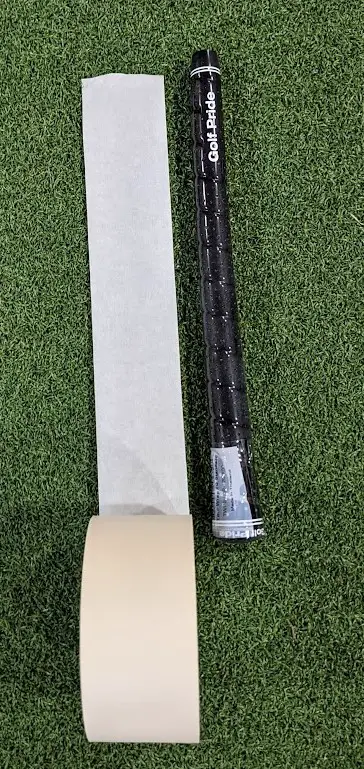
Installing The Grip
If you already are working with a shaft with no grip (and you should by this point), the next few steps should be very easy. Having golf tape makes this job slightly easier but it can be done with masking tape just as well. What you want to do is pull out your grip and tape and make sure the tape is about 1/4 inch less than the length of the grip and about the width of the diameter of the golf shaft. If you are lucky enough to have golf tape, it is most likely correctly sized to your grip and the shaft. This time around I used masking tape.
Put the tape on the shaft while allowing about 1/4″ to extend past the end of the shaft. Tuck the extra into the end of the shaft. Grab your grip solvent and paint tray liner. Put the paint tray liner on a workbench or the like. Now you may want to put on some thin rubber gloves to avoid getting solvent on your hands.
Pour the grip solvent over the tape on the shaft while rotating the shaft. The excess that hits the tape and falls should go into your paint tray liner. You can pour this back into the container when you are finished. Also, pour some solvent into the golf grip while holding your finger over the hole in the butt end of the grip. Give it a nice swirl around and dump the solvent out of the grip and into the tray.
Now for the fun part. Quickly take the grip and put it over the end of the golf shaft. Push the grip all the way down until it is completely on. Make sure there is no looseness where the shaft meets the butt end of the grip. It should be all the way on. Now twist the grip if you would like the alignment of the logo to be straight down with the club head. Let the grip dry for at least half a day if not a day. Then you are ready to play!
Ulterior Motive
I had an ulterior motive here. Since I struggled with dispersion last year with my Sub70 approach shots, I figured I would pit that club against the build I just made. I then decided to hit 20 shots with each, using the same ball and remove what I considered to be the two worst shots with each. Let me throw in the caveat here. The Sub70 8 iron is approximately 1 inch longer than the club I built with the Taylormade 8 iron. I added some lead tape to the bottom of the Taylormade 8 iron and it was still around C5 swing weight. However, it weighed 421 grams. The Sub70 club is approximately 68 grams lighter. Big difference!
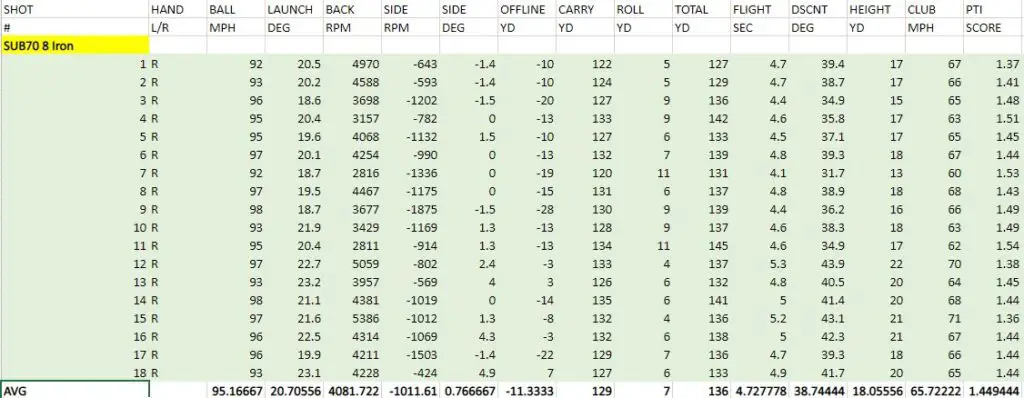
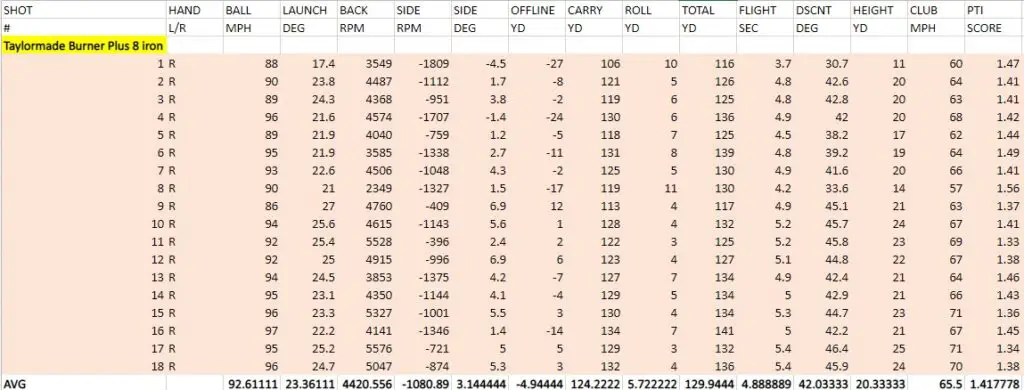
Here are the numbers below. My initial reaction in looking at the numbers is I had approximately 6 more yards in distance with the Sub70 8 iron but the Taylormade Burner Plus had much less total dispersion (offline yards). I do have to say that hitting 10 shots with one club and then hitting 10 shots with the next club and going back and forth like that probably wasn’t the best thing to do. What I mean is the Sub70 8 iron felt very light after swinging the Taylormade 8 iron and I had the same issue in the opposite direction. The numbers gathered below were in using my SkyTrak.
Sub70 8 Iron
Taylormade Burner Plus 8 Iron
I had one more session today in an attempt to straighten out my very strong grip which was causing the large offline yardage (draw/hook) more often than not. I do have to say I saw more ball speed and yardage out of the Sub79 699 8 iron and dispersion was very close between the Sub70 and Taylormade. Points go to Sub70 today.
How To Make Your Own Golf Clubs – Rinse and Repeat
The information I’ve given may seem like a lot of steps but truth be told, if you work on cutting and sanding the shaft along with installing ferrules and club heads one day and grips the following day, this is a fun DIY project. It is that much easier if you have new steel shafts, grips, and club heads. If working on multiple clubs at once, make sure to label each shaft with a piece of tape and the club number. ie 7 iron. Well, that should cover it. Feel free to leave any comments with hints, tips, or your experience in building your own golf clubs.
