Installing a new clubhead or perhaps trying a different shaft? Well you’ll probably have to deal with the ferrule. We don’t want to cause any damage to the golf club so today we’ll learn how to remove a ferrule from a golf shaft.
Luckily, with the right tools and some know-how, removing a ferrule from a golf shaft is a relatively simple process. The first step is to leave the ferrule on the shaft, which may seem counterintuitive, but is necessary in order to break the epoxy bond loose with a heat source. Once the epoxy has been heated and softened, you can then remove the shaft from the head and slide the ferrule off.
Why Remove a Ferrule
Some background for those who aren’t in the know. The ferrule is the small plastic or metal ring that sits between the clubhead and the shaft. It may ever so slightly protect the shaft from damage but in my mind, the ferrule is there sheerly for looks.
If you’re upgrading your equipment or need to make repairs as a DIY, you’ll need to remove the ferrule to access the connection between the shaft and the clubhead. By removing the ferrule first, you can avoid damaging it or the shaft during the removal process.
I’m not into jewelry or bling and most folks I know are on the same page. I do have to say there are some good looking ferrule’s on the market.
Having said that, some golfers prefer to have a clean, uninterrupted look on their clubs and that means not having a ferrule.
The bottom line, is if you need to replace the shaft or clubhead, you can do it yourself rather than paying a professional to do it for you. The fun is in the DIY. By removing the ferrule first, you can avoid damaging the shaft or clubhead and ensure that your replacement parts fit securely and function properly.
Tools Needed
To remove a ferrule from a golf shaft, you will need a few tools:
- A heat source: You can use a heat gun or a butane torch to heat the ferrule and loosen the epoxy bond. Be careful not to overheat the shaft, as this can damage it.
- A utility knife or needle nose pliers.
- A vise or clamp will help keep the club steady and prevent it from moving around.
- Gloves: Gloves will protect your hands from the heat and from any sharp edges on the clubhead or shaft.
It is important to have all of these tools on hand before you begin. Trying to remove a ferrule without the proper tools can be frustrating and can even damage the club.
I made a DIY gripping station which acts as a clamp and holds the shaft of the golf club. It contains a rubber vise clamp that protects the shaft. Here is what the rubber vise clamp looks like. If you have a vise, this would serve you well to protect the shaft of the golf club while removing the ferrule. On the other hand, putting the club (shaft) in the vise prevents you from turning the club while using the heat gun or butane torch. If you can get to the side of the ferrule and underneath then the vise will work fine. So the choice is yours. Many times I hold the club by hand but wear gloves and am doubly sure not to use heat close to my hands.
Step-by-Step Guide
Step 1: Heat the Ferrule
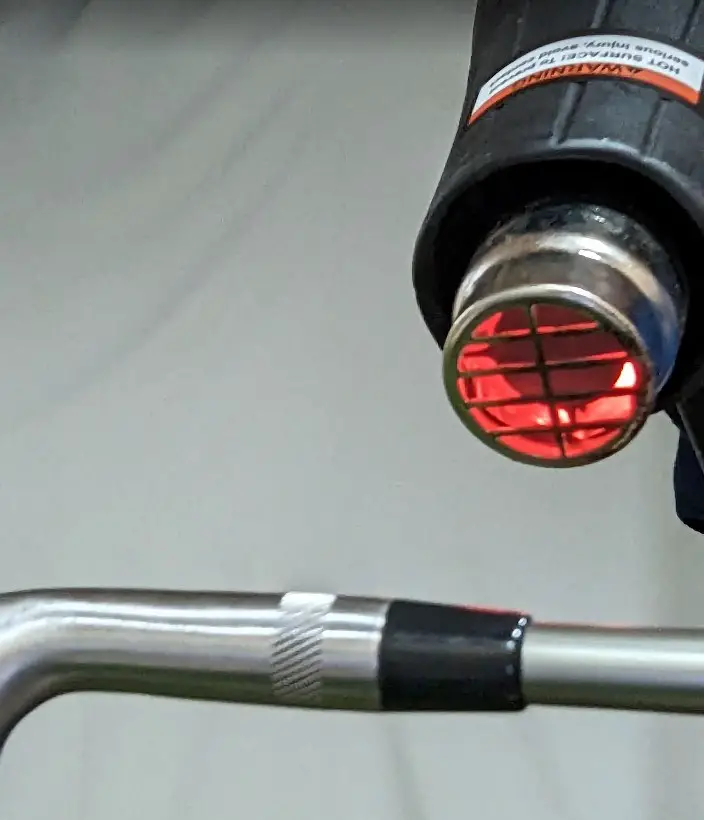
Secure the club in a vise or use the hand held method mentioned above. I highly recommend wearing gloves. Before removing the ferrule from the golf club shaft, you need to heat it up. This will help loosen the epoxy bond between the shaft and the head. You can use a heat gun or a propane torch to heat the ferrule. Basically if you want to annihilate the ferrule and don’t mind cleaning up a little afterwards, use a butane torch. Of course, be very careful to not use too much heat at any one time on the shaft. The way I do it when using a is to turn the club slowly. Be sure to wear gloves to protect your hands from the heat. Hold the heat source about 2-3 inches away from the ferrule and heat it evenly for about 30 seconds.
Otherwise, do the same with a heat gun. Make sure to turn the club slowly while applying heat for a minute or so. If this doesn’t soften up the ferrule enough for removal, give it another 30 seconds. This process will take longer but once the ferrule is softened, you should be able to move to the next step for easy removal.
Step 2: Remove the Ferrule
Once the ferrule is heated, you can remove it from the shaft. If you used a butane torch, just grab a utility knife and use it horizontally moving towards the neck of the club. Be especially careful if you have a graphite shaft. You do not want to dig into the shaft, so again make sure to go horizontally.
Instead of a utility knife, you can use needle nose pliers. If the ferrule is soft enough, you should be able to grab the ferrule with the needle nose pliers and easily tear it off the shaft. Just be very careful not to damage the shaft. If the ferrule is still stuck, you can heat it up once more and try again.

Step 3: Clean the Shaft
After removing the ferrule, you should clean the shaft to remove any remaining epoxy or debris. You can use a solvent such as acetone or rubbing alcohol to clean the shaft. Apply the solvent to a clean cloth and rub it over the shaft until it is clean. Be sure to wear gloves to protect your hands from the solvent.
By following these steps, you can successfully remove a ferrule from a golf club shaft. Remember to take your time and be careful not to damage the shaft or the head of the club. If you are unsure about the process, there is no shame in having this done at a golf or sporting goods store.
Protect the Clubhead
When removing a ferrule, it’s important to protect the clubhead from damage. Be careful with heat and the use of a utility knife or pliers. Use a soft cloth or other protective material to cover the clubhead while removing the ferrule. This will help prevent any scratches or other damage to the clubhead.
It’s also important to avoid applying too much pressure to the clubhead or shaft. Applying too much pressure can damage the shaft or clubhead. Be sure to work carefully and gently when removing ferrules from golf clubs.
No More Ferrule
Removing a ferrule from a golf club shaft can be a daunting task, but with the right tools and techniques, it can be done quickly and easily. Remember to always use caution and follow the steps carefully to avoid damaging the shaft or clubhead.
When removing a ferrule, it’s important to use the right tools, such as a vise with rubber clamp to hold the shaft of the club, sharp utility knife, and heat gun or butane torch. Take your time and work carefully to avoid damaging the shaft or clubhead. And remember, if you’re having trouble, don’t be afraid to ask for help.
Now you can move on to removing the clubhead and even replacing the clubhead and shaft if that is your end goal.
By following the steps outlined in this article and using the tips and techniques provided, you can easily remove a ferrule from a golf club shaft and get back to playing your best game on the course. Good luck!
And as always, feel free to comment and tell me your tips for removing ferrules or what you might like to see on future posts.